
Table of Contents
Introduction
In the modern digital ecosystem, authentication and authorization play a crucial role in securing user access to applications and services. However, misconfigurations in these mechanisms can introduce critical security risks, allowing attackers to bypass authentication, escalate privileges, or gain unauthorized access to sensitive data.
Two of the most widely used authentication and authorization frameworks are OAuth2 and SAML (Security Assertion Markup Language). While they offer robust mechanisms for secure identity management, improper implementation or misconfigurations can lead to severe vulnerabilities.
Authentication vs. Authorization: Understanding the Difference
- Authentication verifies a user's identity (e.g., username/password, biometrics, certificates).
- Authorization determines what actions a user is permitted to perform after authentication (e.g., access control policies, role-based permissions).
The SAML Protocol
What is SAML?
Security Assertion Markup Language (SAML) is used to share authentication and authorization between parties. SAML is often used to provide Single Sign-On (SSO) between one or multiple Service Provider(s) (SP) and one Identity Provider (IDP).
For example, users will authenticate against identity.wepwn.com, once authenticated, they will be able to access serviceprovider1.wepwn.com, serviceprovider2.wepwn.com or serviceprovider3.wepwn.ma without having to re-authenticate against these services. This allows enterprises to only manage one source of truth for the management of their users.
How SAML Protocol Flow Works
The diagram below highlights how a user can use SAML to log into a Service Provider:
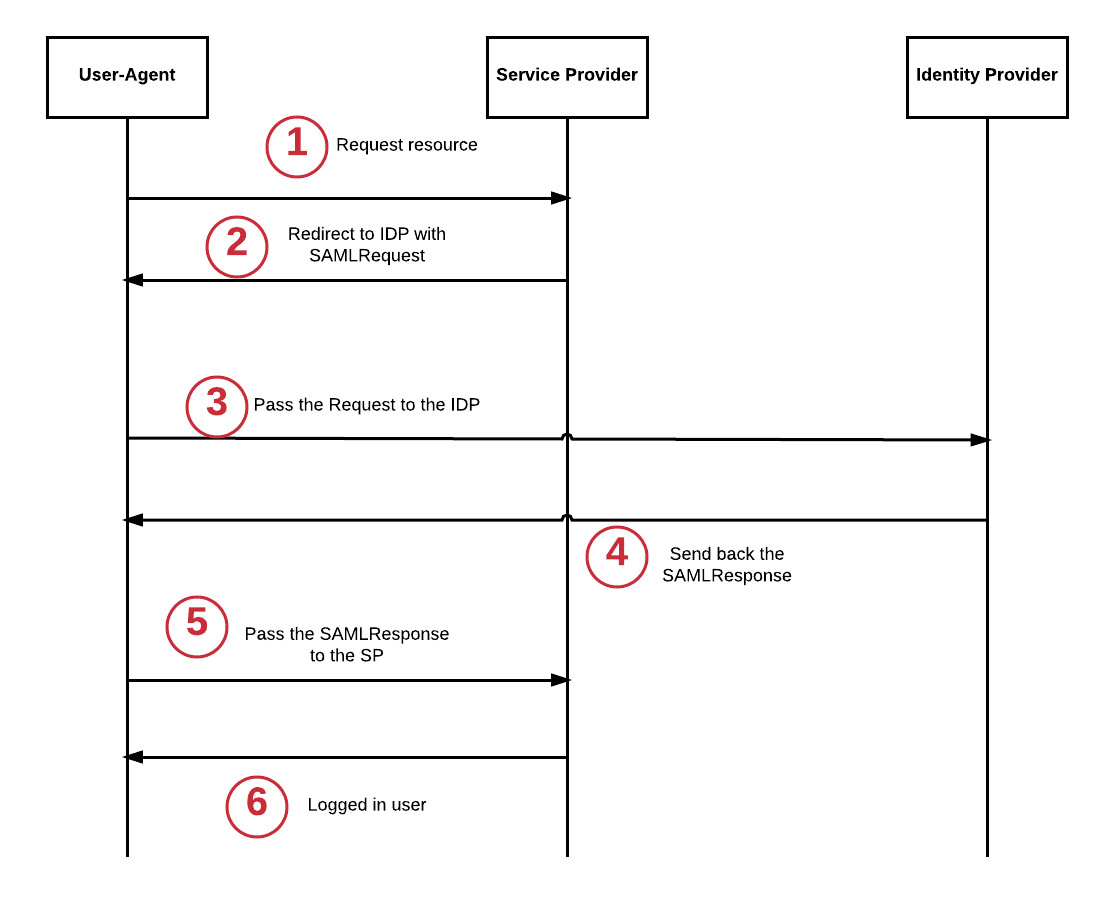
SAML Authentication Flow Diagram showing the interaction between User-Agent, Service Provider, and Identity Provider
- The User-Agent (browser) tries to access the resource.
- The Service Provider (SP) redirects the User-Agent to the Identity Provider (IDP).
- The User-Agent follows the redirect and sends a request to the IDP, including a
SAMLRequestparameter. - The IDP processes the request and responds with a
SAMLResponse. - The User-Agent submits the
SAMLResponseto the SP. - The user is now authenticated with the SP and can access the requested resource.
Note:
The Identity Provider (IDP) is responsible for authentication, verifying the user's identity, and generating the SAMLResponse. The Service Provider (SP) is the application or website the user wants to log into.
HTTP Traffic Inspecting
If we look at the HTTP traffic, we can see the following requests and responses:
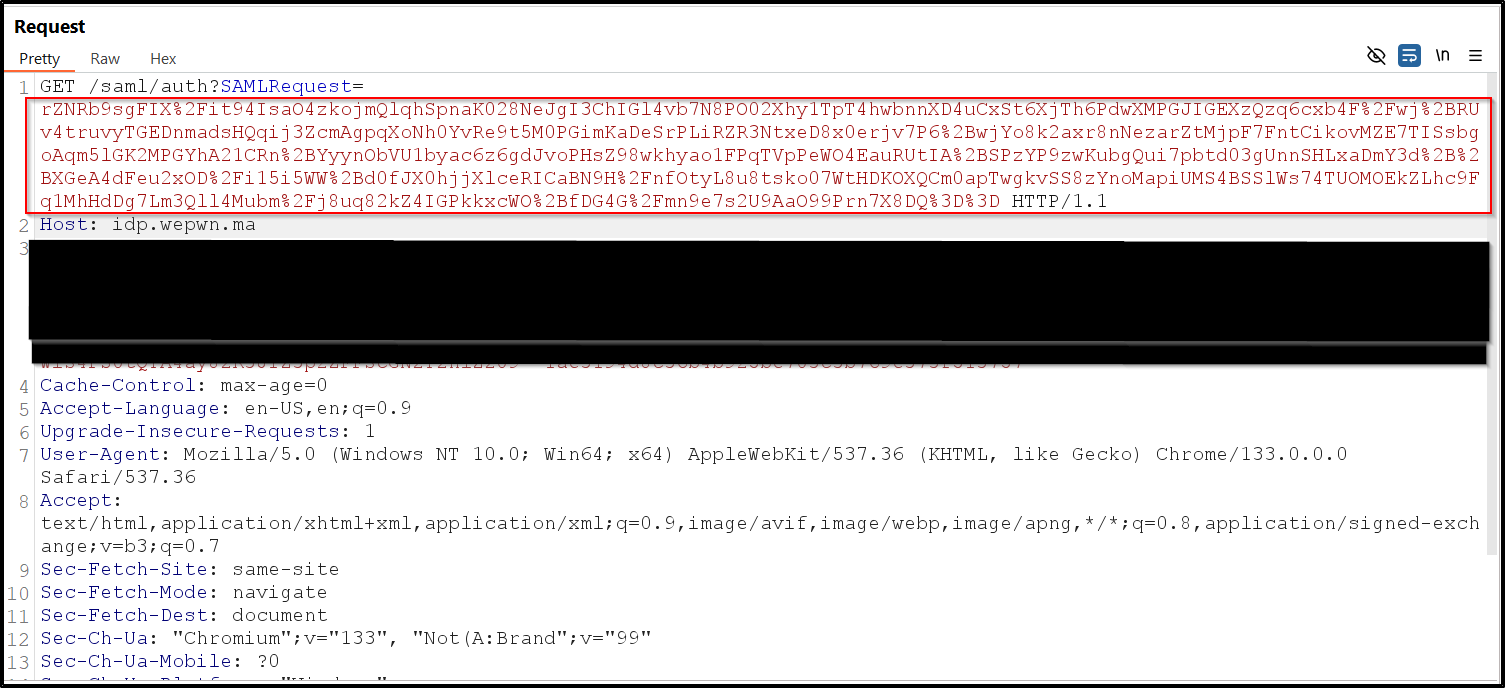
SAML Request
First, the User-Agent gets redirected to the IDP with a SAMLRequest parameter:
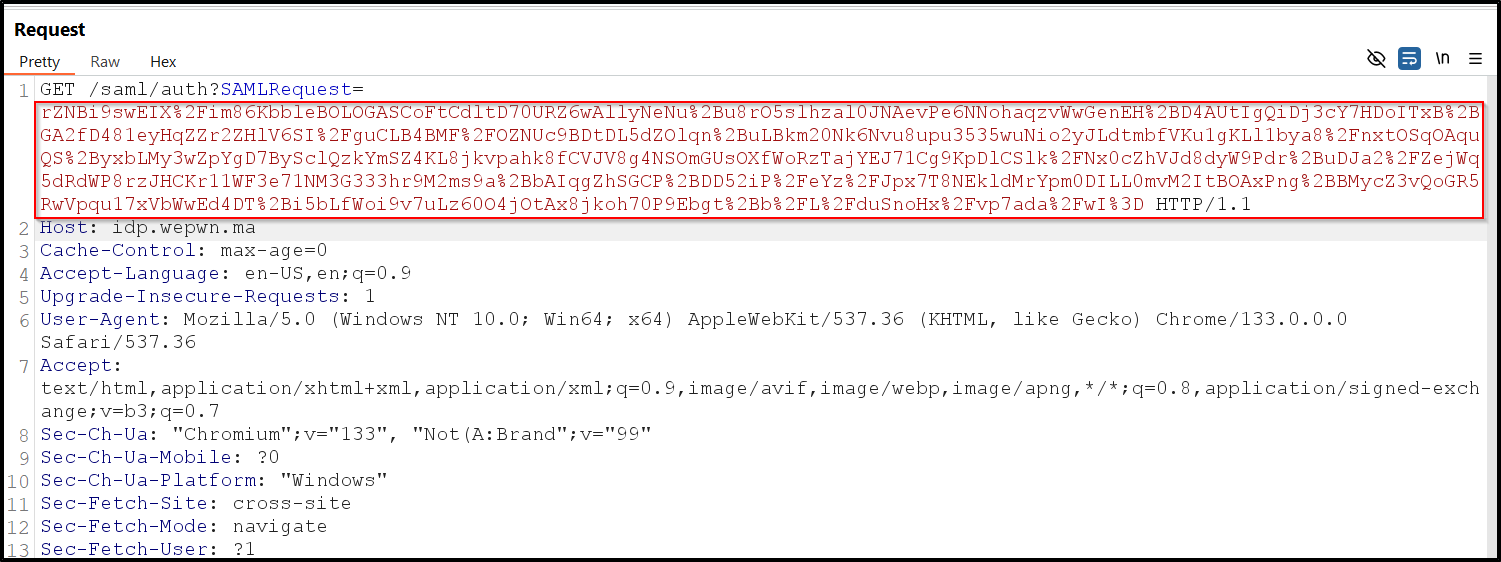
HTTP Traffic with SAMLRequest parameter showing the redirect to the Identity Provider
This will allow the SP to create a session for the user. The user is now logged based on the SAMLResponse value.
SAML Response
If we look at an example of SAMLResponse, we can see that it's a fairly big chunk of data:
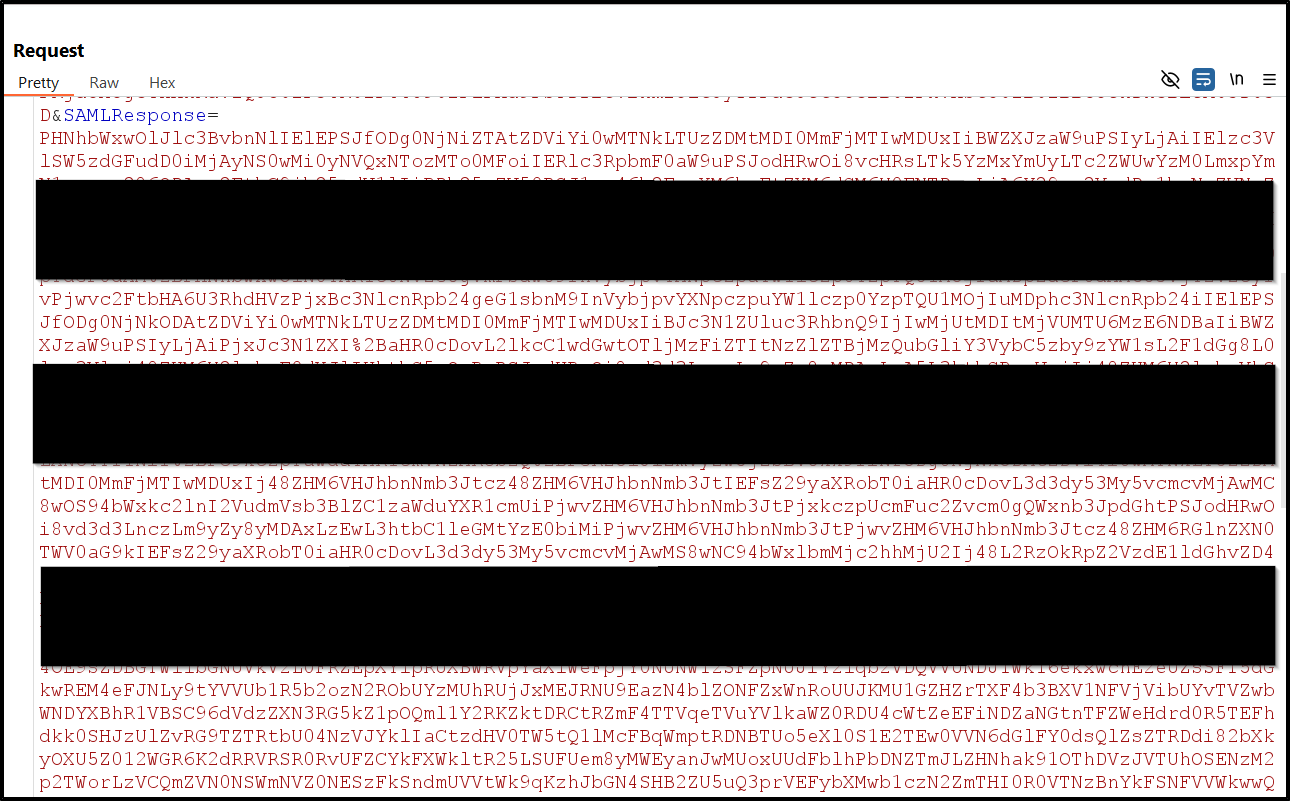
SAML Response Example showing the Base64-encoded data structure
The actual SAMLResponse contains a SAML Assertion and other information like the Issuer, Conditions, Signature, and Attributes. This Base64-encoded string is sent from the Identity Provider (IDP) to the Service Provider (SP) as part of the authentication process.
What's Inside the Base64-encoded SAMLResponse?
SAML Assertion
- Subject: The user's identity.
- Authentication Statement: Details on how and when the user was authenticated.
- Attributes: Information about the user, like their roles or group membership.
Issuer
This identifies the IDP (Identity Provider) that issued the SAMLResponse.
Signature (Optional but common)
A digital signature to ensure the response's integrity and authenticity.
Conditions
Specifies the conditions under which the assertion is valid, including expiration time and the intended audience.
The Vulnerability: SAML Response Tampering Misconfiguration leads to Account Takeover
A typical SAMLResponse is an XML-based message that includes user information and authentication data, signed to prevent tampering. It is usually base64-encoded to ensure it can be safely transmitted over the internet.
Example of a SAMLResponse includes sections like "NameID", "AuthnContextClassRef", and other details that specify the authenticated user and session attributes. The crucial part in the attack is the <NameID> field, which contains the user's identifier (like an email).
The Attack
One of the common issues with protocols relying on signatures to prevent tampering comes from the fact that the signature is only verified if it's present. Here, we are going to modify the email address inside the signature to become the user admin@wepwn.ma for the Service Provider and remove the signature.
Steps to Perform the Attack
1Start the SAML interaction
Starting SAML interaction - screenshot showing the initial authentication request
2Intercept the SAMLResponse

Intercepting SAMLResponse - screenshot showing the intercepted response in a proxy tool
3Tamper with the SAMLResponse to change the email address
Decode the base64 SAML response and change the NameID value

Tampering with SAMLResponse - screenshot showing the modification of the NameID field
4Remove the content of the <ds:SignatureValue> tag (only the content)

Removing signature content - screenshot showing the removal of the signature value
5Forward the malicious SAMLResponse to the Service Provider by re-encoding the tampered data to Base64
Re-encode the modified XML to Base64 and submit it to the Service Provider.
6Successful login as Admin

Successful login as Admin - screenshot showing successful authentication as the admin user
The OAuth2 Protocol
What is OAuth2?
OAuth2 is an attempt to migrate authorization to a third party service. It allows a resource provider (RP), to request access to a user's resources from an identity provider (IDP) subject to the user's approval. The RP is usually the website in scope for the engagement and the IDP is usually an external service like GitHub, Bitbucket, or Facebook.
There are multiple different grant types that change the OAuth flow. Initially, this page will document some of the edge cases which should be covered during Authorization Code Grant flows.
How OAuth2 Protocol Flow Works
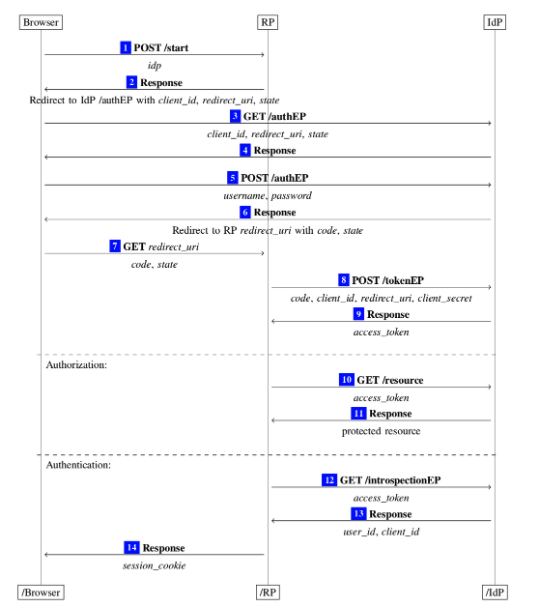
OAuth2 Protocol Flow diagram showing the interaction between Browser, RP, and IDP
In this diagram, the RP (Relying Party) is the website you are testing, and theIDP (Identity Provider) is the entity that owns the user's resources. Let's walk through each step of the diagram with a bit of hypothetical commentary to ensure the unaltered flow is understood.
OAuth Flow Steps
1. The Browser selects a provider, let's say GitHub, in the application and clicks "Connect to GitHub."
2. The RP receives this request and directs the Browser to the IDP along with:
- A public
Client_Id - A
Redirect_URI - A
Stateparameter
3. The Browser accepts the redirect and navigates to the IDP endpoint.
4. The IDP responds, asking the user to authenticate and approve the scope of the OAuth request (e.g., repo-level access, admin access, etc.).
5. The Browser sends authentication information and approves the requested scope.
6. The IDP redirects the Browser to the Redirect_URI along with:
- The
Code - The
State
7. The Browser follows the redirect to the RP's OAuth endpoint, passing along the Code and State.
8. The RP makes a call to the IDP, attempting to exchange:
- The
Code - The
Client_Id - The
Redirect_URI - The
Client Secret
Note: Don't confuse this Redirect_URI with the one used in Step 2. This request isnot sent through the browser and is likely not modifiable.
9. If the Client Secret and Code are valid for the given Client_Id, the IDP returns an Access Token to the RP.
10. The RP now wants to access the user's resources. It calls the IDP's endpoint with the Access Token as a parameter, usually via a custom header.
11. If the Access Token is valid, the IDP returns the user's resources.
This breakdown clarifies the OAuth flow, making it easier to identify potential security flaws.
The Vulnerability: Cross-Site Request Forgery Vulnerability in Misconfigured OAuth2 Client
The vulnerability here is a simple Cross-Site Request Forgery vulnerability in the OAuth2 Client.
OAuth2 Clients use a parameter named state to ensure that the request when the User-Agent gets redirected to the OAuth2 Client from the Authorization Server (IDP) comes from the OAuth2 Client (RP) and was started for the current user.
In this application, the OAuth2 Client doesn't use a state parameter and we can use this behavior to get the victim to link their account on the OAuth2 Client to an account we control.
The Attack
1Start the OAuth2 flow in your browser

Starting OAuth2 flow - screenshot showing the initial OAuth2 login screen
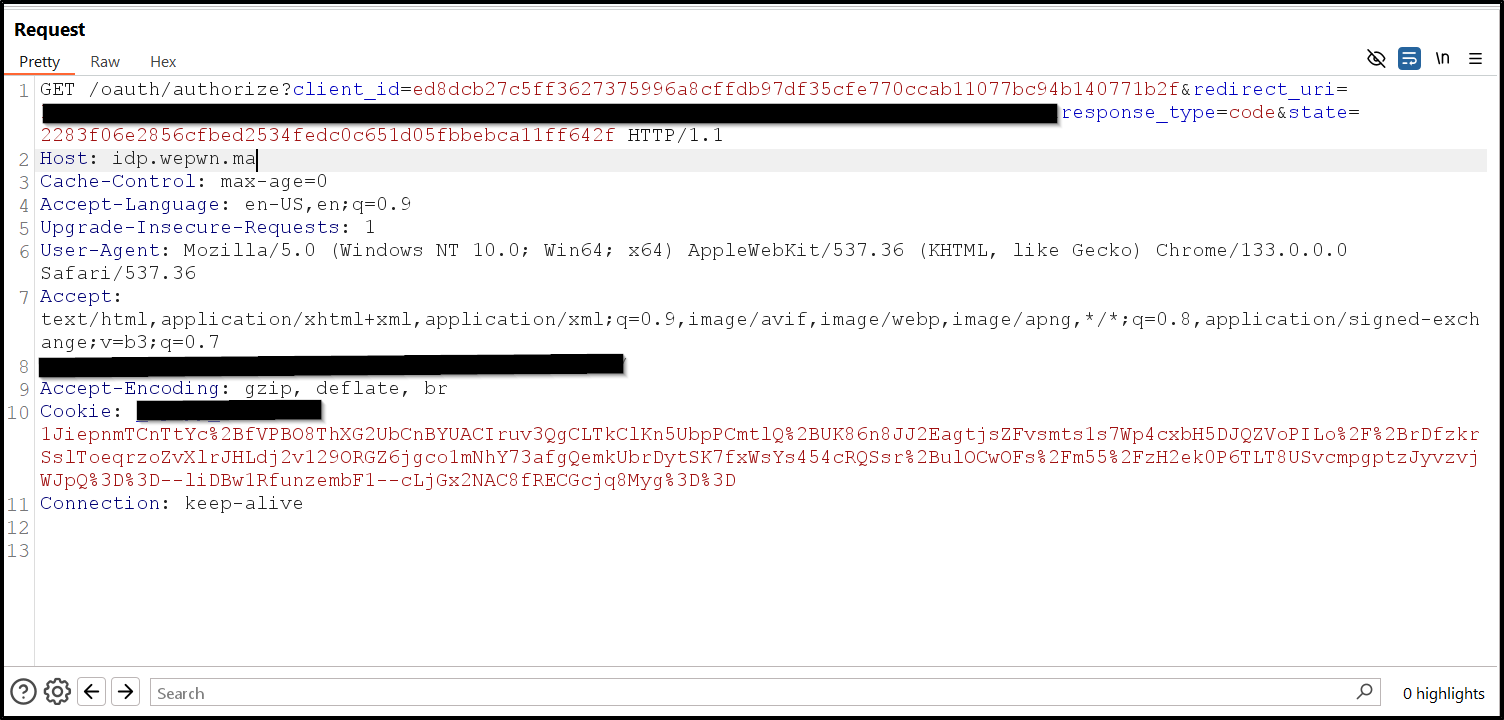
OAuth2 authorization screen - screenshot showing the authorization request
2Stop before the redirect to the OAuth2 client (RP). (Copy the URL From Burp)

Intercepting the redirect - screenshot showing the intercepted redirect URL
3Get the victim to visit the link
Send the intercepted URL to the victim through any social engineering method.
4The victim's account gets linked
When the victim visits the URL, their account will be linked to your OAuth2 account.
5Log in as the victim on the OAuth2 client via "Login with OAuth2"
And here we linked the victim account (Admin) by Our Account

Successful account linking - screenshot showing successful authentication as the admin user